At the weaving studio we get lots of fabric and yarns donated. Some good, some bad, some that leave you a little perplexed. A couple weeks ago, after cleaning, the ladies of the weaving center found themselves with a whole box of upholstery samples to get rid of. Not wanting them to go to waste, we turned our minds to what we could do with them. For example, at the Warped Milwaukee show we used them in a window display, we cut letters out of them to put on the wall, and I used a couple of them to make the Best in Show Ribbon. I brought home almost a whole bin full of them and used some more to make Kumihimo bags for the Art vs. Craft show.

And now, I've found yet a couple more uses for them. I'll only show you one of them today. I'll save the other one for later in the week. Do you do advent calendars in your house? The Christmas my daughter was 2 was the year I started making her an advent calender. Sort of. I bought 25 tiny stockings, numbered them and hung them in her room. In each one was a tiny toy or a piece of candy and she would get to open one every morning. This went on for a couple years, with me buying more and more ridiculous pieces of, for lack of a better term, garbage to put in her stockings. Once my son was born it got even more complicated. Do I now buy him 25 miniature stockings and go through the struggle of finding little crap to put in them? Do I make them share? Do I just stop the tradition all together? Yes, that's what I did. It was too much of a waste. I had once again gone overboard on something and now it was time to tone it down.


And now, I've found yet a couple more uses for them. I'll only show you one of them today. I'll save the other one for later in the week. Do you do advent calendars in your house? The Christmas my daughter was 2 was the year I started making her an advent calender. Sort of. I bought 25 tiny stockings, numbered them and hung them in her room. In each one was a tiny toy or a piece of candy and she would get to open one every morning. This went on for a couple years, with me buying more and more ridiculous pieces of, for lack of a better term, garbage to put in her stockings. Once my son was born it got even more complicated. Do I now buy him 25 miniature stockings and go through the struggle of finding little crap to put in them? Do I make them share? Do I just stop the tradition all together? Yes, that's what I did. It was too much of a waste. I had once again gone overboard on something and now it was time to tone it down.
This year, as I sat gazing at these upholstery samples I had an idea.

See the grommets at the top? It's already ready for hanging. And the edges? They are already finished! How much simpler could this get?

All this fabric needed was some mini pockets. And maybe a little decoration. It doesn't even need to be perfect because it's homey and it's supposed to look homemade. So the seams? Don't worry about them. I cut muslin (nina again!) into strips that I folded over, ironed, and laid on top of each other. The longest strips are about 8 inches by 4, folded over the long way and ironed. Then the folded side is placed to the top and the strips are placed a little overlapping each other.

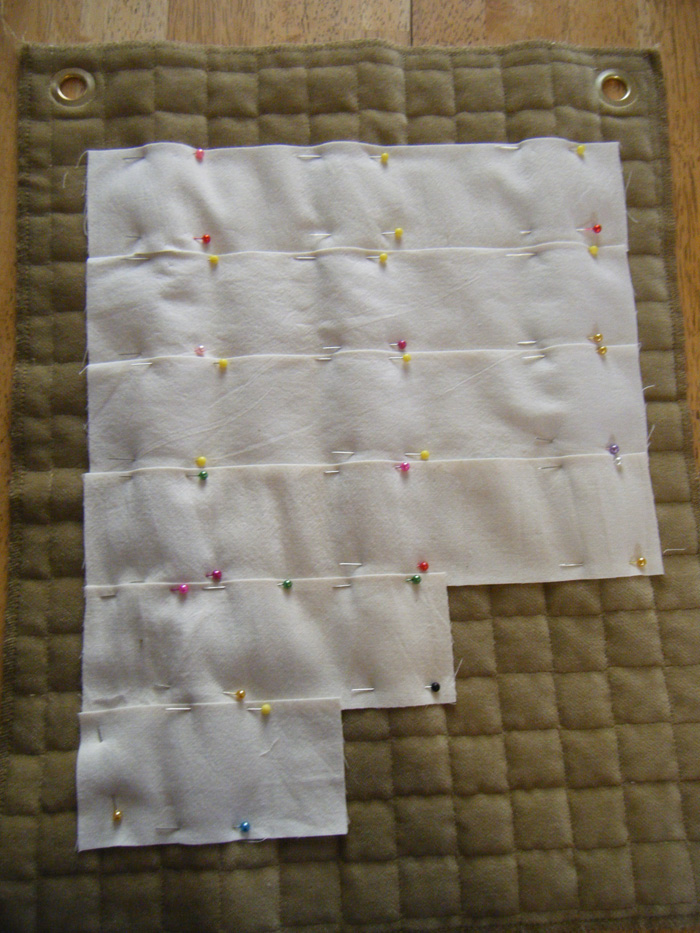
Pin in place and then sew the bottom edges with a zig-zag stitch. Use a sparkly, festive thread if you have one. Start with the bottom strip. Sew the bottom edge, unpin it and fold it down to do the next strip.

Once all the bottom edges are stitched you can put all the strips back up again, pin back in place and stitch their sides in the same zig-zag stitch. Then measure out the size pockets you need. I think mine were 1.5 inches? Somewhere around there. I used a ruler and a pencil and actually drew lines. Then I traced the lines with a straight stitch to create my pockets.


I bought this really cool stamp set at the Farmer's Daughter Antiques (5th and National) about a year ago. It was perfect for this project.

Again, I wasn't really worried about anything being perfect. That's part of the charm of this project.

I deliberately left space at the bottom so I could put some little Christmas trees in. All done! Except for the candy.

One piece in each little pocket. Easy Peasy. They can be used year after year and all I have to buy is a couple bags of candy.
Total Time: 1.5 hours.